A few decades back photo editing was a dark room job. The
negatives gave the best possible results what one’s camera could capture. While
making the positives using a projection machine taking the exposure on special chemical
sensitive paper in a dark room, the operator could prevent certain areas from
getting exposed and hence the finished positive print showed the result of
actually how much the photographer wanted to show. It was an indirect method of
photo cropping. Discerning photographers those days not only shot the photo but
did double-up as dark room operator to get the prints as per their liking.

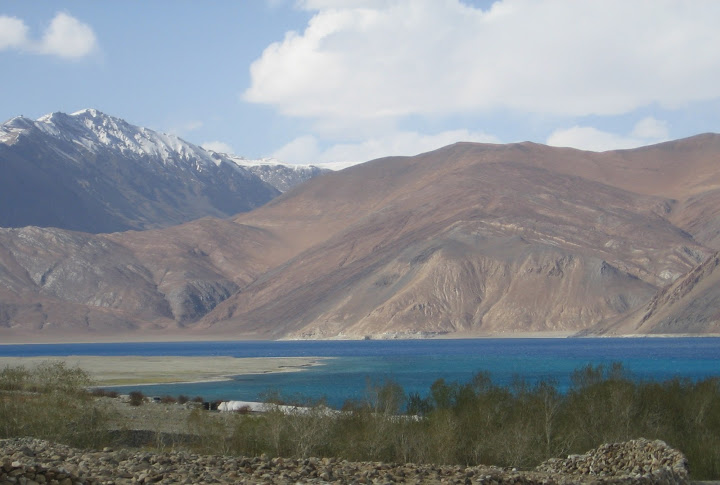
The frame above shows the intention of photographer to crop
top portion. What exactly to chop? It depends on what the photographer thinks
which will make his photo more appealing, the focal point more prominent and
some time even tell a story.

Chopping off most of rubble portion from bottom makes the
photo look better with centre of attraction getting prominence. Small portion
of foreground rubble is left intact to give depth to landscape. Some portion
from right side is cropped which appeared less interesting.

Frame 2

The cropping on left
hand side and some rocky portion from top improves the image dramatically. The
raft, the central theme gets the prominence. Ideally for a moving object there
should be more space in the front than at the back, to create an impression
that the moving object is entering the frame rather than exiting it.

Frame 3

The
same shot when cropped from all sides, looks more appealing. The centre of
attraction, the flower gains prominence.


The same photo has been chopped almost 40% from bottom and
right side to create a story – A Gull is trying to land amongst the crowded
Gulls in a narrow space.

Frame 5

The center of attraction the orange temple looks more
aesthetic when placed 1/3rd distance from top and 1/3rd
distance from side by cropping from top as well as right side. Some small
portion from bottom is also cropped.

Frame 6


With the advent of digital photography since last ten years,
computer became an essential gadget for the downloading the images from camera.
With the availability of plethora of photo editing software, the scope of
producing a good photo is for the asking. The making of a good photo involves
shooting a scene or portrait by proper exposure (a combination of exposure time
and aperture) offered by one’s digicam. A normal photo for memory sake with
individuals being a part of a scene was rather easy and could be shown in the
computer screen. Such photos never went through photo editing unless one was
inclined in doing so. Individuals who aspired to create an aesthetic photo took
to photo editing in a big way.
Any camera manufacturer provided its own proprietary
software to take care of various needs of photographer like what the camera had
to offer and of course and editing the photo. Nikon Capture NX and
Canon ZoomBrowser EX are some of free photo editing software provided by
company when a digicam is purchased. People who purchase HP printer cum copier
do get a photo editing software called HP Image Editor free. Microsoft
Office Picture Manager which comes as a part of Microsoft Office software
does the same job and is most widely used.
A typical Microsoft Office Picture Manager is shown below.
After opening a picture file, on top menu, click edit pictures…, a side
menu appears. On side menu click crop, the photo periphery bars and
corners appear. Dragging those, one can decide how much to be cropped and how
much remains. Then click ok and save the new photo in Save As……
mode, so as to keep the original photo intact. The advantage of saving in Save
As…… mode rather than Save mode is that one does not want to lose the original
image. Some times after repeated cropping, the photo loses its importance and
one can start all over again from the original image. A
word of caution. While closing the edit window, another window asking you
whether you would like to save the changes. Click no. If you click yes, then
the original photo will be edited and it is as good as lost.

Following are a few demo frames where the original and the
cropped ones are shown.
Frame 1
Following frame shows the photo shoot of Pangong Tso at
Ladakh. Apparently the photo looks good. If you view it carefully, it will
appear, the central attraction of photo, the lake with varying hues of blue is
dwarfed by the foreground full of stone rubbles.

A raft is going down stream on a river. While photo shooting
it has been positioned bang in the middle of the frame.


Frame 3
Frame shows a small flower captured in normal settings of
camera. The leaves in background are distracting the main centre of attraction
- the flower.


Frame 4
Following frame shows a large group of Gulls, a random shot
at high zoom. The picture in not attractive enough to tell a story


This frame shows orange colored temple captured along with
other elements in a typical landscape scene. The center of attraction is almost
at the center.


A bunch of Lily flowers in the following frame look pleasant
enough. All the flowers look fresh, crisp and clear. It is worth trying some
cropping to achieve a different type of composition.

From above frame a specific flower was targeted to try a diagonal
composition, which involved a huge amount of cropping.

There are basically two types of photographers.
a) Those who have ample time in their hand and subject of
interest is available for a long duration. He does most of his composing in
camera itself and hence required to do minimum cropping in computer to achieve
the desire result.
b) Those who are trekking or on expedition or travelling
have very little time in their hand. They shoot really fast and to be on the
safer side take in their frame more than required. Later they seat at leisure
in front of a computer and do the photo cropping.
The image size which is expressed in KB or MB is an
important factor to justify cropping. A 2MB to 3MB photo will allow a large
amount of cropping if the photo is properly exposed and focused and will look
equally good after cropping.
The photo taking ability of any individual will improve over
the years with as much practice as possible. One develops an eye or a kind of
judgment to decide the composition of photo in LCD screen itself and hence sits
for much less time in front of a computer for cropping, to get the desired
result.
………………………………………………………………………………..
No comments:
Post a Comment